 |
| From Stuff Maker Blog |

Showing posts with label Foam Smiting. Show all posts
Showing posts with label Foam Smiting. Show all posts
Wednesday, October 13, 2010
How to make a back flag


Wednesday, September 15, 2010
Making a Back Flag: Concept
 |
| Image from Belegarth.com |
I have long wanted to make a back flag. You can see in the above image one such flag. I am hoping to put togather a set of "tournament" garb and the back flag is a key part of my concept. I think they look way cool. Here is my mock up:
Tuesday, May 11, 2010
Making a Shield - prt.2: The rest
These 2 shields have turned out the best I have yet made. Maybe not Edhellen quality, but pretty nice if I do say so myself. I basically followed this tutorial so if you want to follow along with it, but see actually pictures, here they are.

First I took my shield blanks I already made. (see here)

Laying them on a camp pad I used them as a template that I "traced" with my knife.

The first of 3 face layers cut out.

Then I cut stripes for the edge layer. Enough for there to be 4 layers covering all edges.

Face layers glued on.

Edge layers from the back.

Edge layers from the front.

Next I taped the seams with duct tape to reenforce them. Be sure to use a good and sticky tape or it wont work. (you can't see it but I taped the face side as well)

You will also note that I added straps. I did this before I glued the first face foam on. Use a strong strapping that you don't have any fear of ripping out, it will be a pain to replace.

Next I took a peace of fabric and marked a circle 5" larger around it. See this tutorial.

Here you can see I cut along that marked line.

And sewing like the tutorial said I made it in to a draw string cover.

Shield one I painted with wood stain and acrylic paint for the details.

The Second I painted with spray paint, black is the base coat, with a red over resulting in that nice deep read. I used masking tape to help define the edges.
Saturday, April 24, 2010


Tuesday, March 16, 2010
2 from one Punch Sheilds

A few months ago my medium rectangle shield fell apart, the glue gust stopped holding, which left me with a peace of wood and a bunch of sill usable foam. So I cut the wood into two 12" round punches. They are all reclaimed foam from the shields and an old sword who's core snapped but blade was still good.


The only new materiel used as the fabric for the wood slat shield cover. The other cover is made from the old rectangle cover.

Even the handles are made from the scraps left from the old wood backing.
Monday, December 14, 2009
5ft Spears

I made 2 new spears with a poof football I bought wile I was filming a documentary in the states. They are 5ft cores and the same size as my origonal 5 1/2ft spears. You can see them side by side, light grey cover with painted brown shafts. Looking a lot more like spears. I now have 7 spears. I like spears more than swords, even though they are a bit more expensive, they last longer. These new spears use 100% reclaimed foam in the form of ether un-usable scraps or salvaged sword blades from broken swords.

Saturday, November 7, 2009
Pro Foam Fighter: Foam Tech - Mog's Cover Design
Ok, I made this up the other day, depending how things go I might make some more and turn it in to a series of sorts. As far as I know the sword cover method shown in this video is original, I have never seen it on another weapon before. I really like it, and hope to cover my future weapons in this manor as the benefits are so large.
If you want to know how to install grommets or eyelets see my tutorial: Eyelets Are Easy
Tuesday, November 3, 2009
Ax Hammer finished!
You may remember this Ax Hammer from way back in January:


The cover was a bit of a tricky job, and done in a rush, so not as good as it could have been.

Thursday, July 30, 2009
7' Spear
 |
| From Stuff Maker Blog |
7' about, brown wood stain on white hockey tape. Used a poof football for the tip I got in LA for $4 just for this.
Thursday, June 18, 2009
New Sword
Yesterday I sat down and made a sword out of the first half of the fiberglass core got a few weeks ago. I love it.

It comes in at around 32" despite the fact I cut it at 27". There is a stabbing tip on it, but I am thinking it is not soft enough. My next sword will be shorter and have a stabbing tip in Darr's design I think.

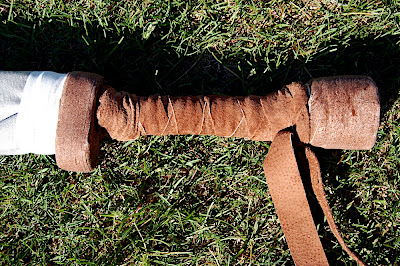
I used white hockey tape and wood stain to get the brown. I hope it holds up because I love the look.

The grip was first obliged with foam strips and for 7g tier weights. Then wrapped in thick rope (same stuff on my longer brown sword), then wrapped in white hockey tape stained and then in leather from an old leather jacket. It is quite nice.
Thoughts?
It comes in at around 32" despite the fact I cut it at 27". There is a stabbing tip on it, but I am thinking it is not soft enough. My next sword will be shorter and have a stabbing tip in Darr's design I think.
I used white hockey tape and wood stain to get the brown. I hope it holds up because I love the look.
The grip was first obliged with foam strips and for 7g tier weights. Then wrapped in thick rope (same stuff on my longer brown sword), then wrapped in white hockey tape stained and then in leather from an old leather jacket. It is quite nice.
Thoughts?
Friday, March 13, 2009
A swords guts.
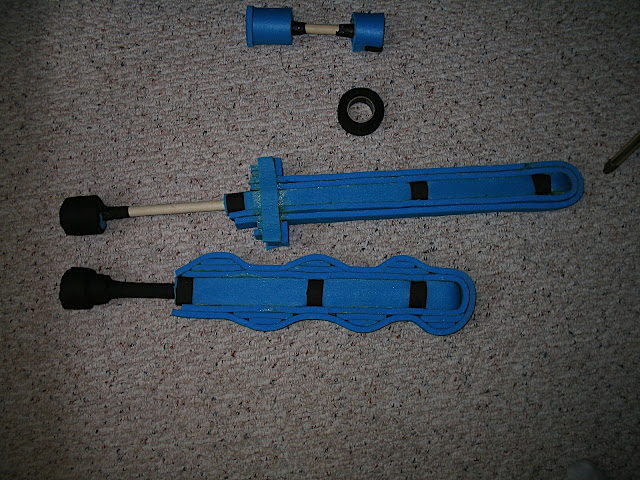
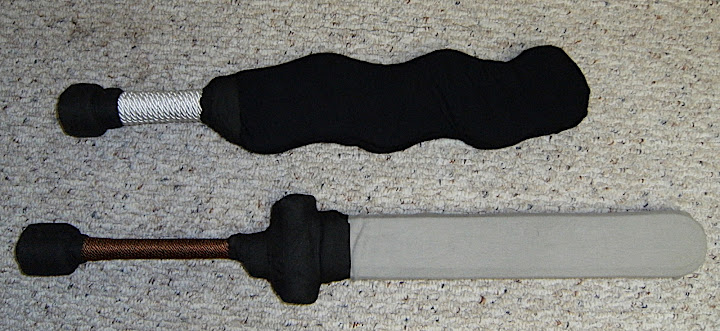
Sorry all, this is not the post I intended to make this week, but the week got away from me! So in lue of what I meant to post here is 2 photos of swords I have made. One showing their construction (glued), and the the other with covers. If you ever wondered what a swords guts looked like, now you know. :)
Wednesday, February 25, 2009
Cheep Club and Flail - Progress 2


Tutorial: Take a stick covered in foam. Rub it on your face. Valah! You have a ugly stick!
Subscribe to:
Posts (Atom)