Showing posts with label All. Show all posts

Monday, August 8, 2011

Weapons Rack

1 comments
You can see me on the left in my armour (Photo by Savage)
I was privileged to attend my first ever american Belegarth event a few weeks ago, Chaos Wars in Hailley Idao. I was able to set up my pavilion tent in our Canadian Camp and we used it as our gear tent, one half housed all our food, coolers, dishes and other eating supplies, and the other side housed fighting gear such as weapons, armour and repair materials.


However, the inside of the tent began to fill up with all our gear, it formed a large pile so that we couldn't really get at the weapons we wanted and the weapons a the bottom were getting squished. Whats more the pile began to encroach on the food side of the tent so we couldn't get at out food ether.


The solution to this was to build and arming rack out of stick from the woods. we used as much rope as we could find and then some duct tape when that ran out. Our passing weapons would be leaned on the rack wile the failing weapons that needed repair would be placed in the tent so on one would accidentally use them.

Camp "Canaidia"
You can see we added a few modifications as the week went on to better accommodate different weapon sizes and add structural integrity. When we packed up we just cut the tape of and through the sticks back in to the woods!

Tuesday, July 19, 2011

Popular series from the past: N00b Steel Armouring Basics

0 comments
     For me, making steel armour was one of those things that was an unattainable idea. I didn't have any idea how it was done, no idea what tools were needed. I just knew that I didn't know. But I tried anyway, I am sure anyone who knows anything about armour smithing will get a headache from the pain inflicted by my poor technique but at least I tried.
     These tutorials are more proof that if you try to do something you can get some pretty descent results. So with the cheviot that I really have/had no idea what I was doing, if you follow these tutorials you can begin your journey in to the wonderful world of steel.

Thursday, June 23, 2011

Popular series from the past: N00b Leather Armouring Basics

0 comments

I will once again that I am no expert on anything I do on this blog. Like 90% of my other tutorials the photos you see are my first time ever attempting to make said item. I really honestly have no idea what I am doing, I just wing it and hope for the best. That said, I have been fortunate to have a achieved some pretty cool results. Here are my leather armouring tutorials:

Thursday, June 9, 2011

Popular series from the past: Rag Rug Garb

2 comments
     To get myself going I am going to post a series of articles linking to my most popular tutorial collections. The first is about my "famous" Rag Rug garb. Rag rugs are very versatile, cheep, and easy to work with. The possibilities of how to put them together are endless, I have come up with 2 methods that work well.

     Rag rugs garb, some people love it, some hate it. I call them "poor man's gambesons". Though they don't offer any real physical protection like a proper gambeson they do offer a fighter many of a gambeson's other benefits. They offer a good bit of padding to hard blows that takes the sting off if you have sensitive skin, they offer great padding for chain mail and other armours making them more comfortable to wear and get hit in, they breath very well in hot weather because of the large loos weave, and also provide insulation and warmth in cold weather.
      Rag rug garb can be very simple to make, it can take less than 2 minutes to put together a simple tabard/vest and perhaps an hour to but together a full coat. I find my rag rugs at a dollar store (dollarama) for $1-$2 a peace, making the cost range from $2-$8 for a peace of garb.

A rag rug coat.
A spear man in a rag rug tabard.


Wednesday, September 15, 2010

Making a Back Flag: Concept

0 comments
Image from Belegarth.com

I have long wanted to make a back flag. You can see in the above image one such flag. I am hoping to put togather a set of "tournament" garb and the back flag is a key part of my concept. I think they look way cool. Here is my mock up:

Tuesday, August 3, 2010

Monday, June 7, 2010

Burned Leather Awards

0 comments

For our local bit event - Battle for Strathclyde I always make some awards for various feats, such as coming out on top of the dulling turny. This year I made 2, I used my wood burring set and went for a Egypt theme.

These are usually worn proudly on ones fighting garb made fantastic conversation starters.

Monday, May 31, 2010

Leather Lorica Segmentata

0 comments
My original side of leather.

Gets cut up in to paces and then submerged in water for to long and goes moldy.

Luckily, I am planing on "baking it" to harden it. To say "baking it" is a bit deceiving though, basically I am turing my oven in it a dehydrator. I set it to about 190f for 3 hours (probably longer than I needed).


I assemble, as I have no rivets on hand I lace the hole thing togather. We will see how long that holds...

I use a dark wood stain to give it a nice color, though, the baking did give it a bit more of a tan look without its help.

Monday, May 3, 2010

Foams

0 comments
I made a discovery the other day when I finally ran out of the foam I bought in the USA I went and got some here at home... And low and behold! The American foam is thicker!


I had my suspicions after making my last fiberglass sword and it came out as big as my PVC swords do (previous ones using Canadian foam being noticeably smaller). Well anyway, just thought I would share.

Monday, January 4, 2010

Another Hat

0 comments
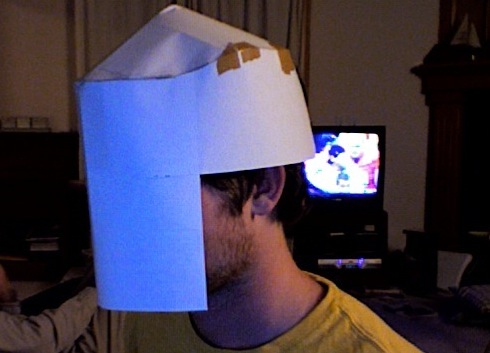
And we are back from the holidays! I got depressingly little crafting and making done over the last 2 weeks. But I did get to something last night, I took another go at a hat. This time bit more complicated.

1. I used one of my favorite hats as visual pattern. Looking at it and doing aproximate measurements of all the peaces. (I used an appropriately sized plate for the top pattern)

2. I used leather from a old leather jacket I got from a thrift store. And traced my paper patterns on with a sharpie pen I got for christmas.

3. I used the had once again to look at how the thing was sewn togather and mimicked it as best I could. It turned out pretty good. But unfortunately, it is a fair bit to big. Next time I will need to take off about 1/4" around all the peaces I am thinking.


Monday, December 14, 2009

5ft Spears

0 comments
I made 2 new spears with a poof football I bought wile I was filming a documentary in the states. They are 5ft cores and the same size as my origonal 5 1/2ft spears. You can see them side by side, light grey cover with painted brown shafts. Looking a lot more like spears. I now have 7 spears. I like spears more than swords, even though they are a bit more expensive, they last longer. These new spears use 100% reclaimed foam in the form of ether un-usable scraps or salvaged sword blades from broken swords.

Monday, December 7, 2009

Pillbox style hat

2 comments
I have been wanting to make us one of these hats for myself for a long time. We use them at the passion play every year and I really like their look. This one is a bit basic, and a snap to make.

As you might be able tell, I made it just a bit to big.

The black fabric is let over from my pants.

The top brown fabric is left over from my tunic.

Monday, November 30, 2009

Leather Helm: Type A - Part 2

0 comments
Ah! Just realized I had not written this post yet! I was wondering why blogger wasn't auto posting it.

To make my pattern I started with paper that looked like cross. It was in the shape of the most leather I know I could use. From there I worded on getting the seam from face to top to shape nicely to my face. I taped it togather to make sure it would work. If it wouldn't work or only just barley worked with paper I knew it would not work with thick leather. did a lot of trimming and re-taping at this stage.

Once I cut it out and drilled the holes I sewed it togather with some special ultra strong thread. All the threading it doubled. I then made a skirt of chain mail and linked it to the threading I had done on the outside edges. It felt kind of incomplete without it.

Then I used wood stain to die it. Now I should have done the stain before the chain... but I had lost the stain for a wile, got impatient and added the chain first.

Here you can see it finished. I was happy with the staining, this is the first time I have got the uneven stain strokes to work right.


Check out some of my other leather working tutorial that apply to this one:

Monday, November 23, 2009

Leather Helm: Type A - Part 1

0 comments
Ok, so I rediscovered my leftover scrap of leather. I have wanted a helm for a long time, helmets just add that extra something to a worriers look. With or without armor, helmets look cool. I wanted to have some face protection for defense from those pesky projectiles and stray face shot from swords.

I wont promise that this will be a master peace, for instance, I learned that I need to find something better than aviation snips to cut my leather with. THey just cant do the details on the thicker parts.

You will need a peace of 12+ oz leather to have a helm that counts as armor in Belegarth. You will also need: paper pattern, pencil or pen, cutting device (like aviation snips).

My peace of leather was quite small, and mis-shaped. I could only get one grieve out of it or barley two bracers if i had wanted. I was amazed as how much helm I got. I experimented a fair bit to make the pattern. I started with a paper cross as big as I knew that I could get away with, the began to cut away at it to make the shape, continually taping it togather and testing, thin taking it apart and adjusting.

I traced it with pencil, but because the camera could not see the pencil like I traced it again with pen.

I cut it out with aviation snips, and tried a hack saw, but it didn't work all that well ether. But it did get done.

Since I am going to be lacing this helm togather I used an electric drill to make holes every 2cm along every edge of the helm.

To be continued.

Wednesday, November 18, 2009

Topsite.UltimateSwordFighting.com

0 comments
Hey everyone, we are now listed on Topsite.UltimateSwordFighting.com as you might have seen by the counter on the right of the page. Please go to Topsite.UltimateSwordFighting.com and vote for us, right now we are #2 lets see if we cant get to #1!

Monday, November 16, 2009

Team Tabards

2 comments
I made up these tabards with the remains of the green and purple cloth I had got from Mog to make the other tabards I posted. They are what I call "sports tabards", more commonly known as skinny tabards. The idea is they can be used to help differentiate teams at practices.

The little orange things are rope flags. The Airdrith logo is acrylic paint, and the black stripes are spray paint.

Edit: It took me a few hours to make the green tabards and a few to make the purple tabards, and were made very quickly. As I didn't want to spend much time making them (and was short on bias tape), the first few tabards have simple single folded edge with a zig zag pattern. However I got brave a pulled out the hemming foot for my sewing machine and within a few tabards had figured it out. It makes wonderful tight little hems.

Saturday, November 7, 2009

Pro Foam Fighter: Foam Tech - Mog's Cover Design

0 comments

Ok, I made this up the other day, depending how things go I might make some more and turn it in to a series of sorts. As far as I know the sword cover method shown in this video is original, I have never seen it on another weapon before. I really like it, and hope to cover my future weapons in this manor as the benefits are so large.

If you want to know how to install grommets or eyelets see my tutorial: Eyelets Are Easy

Tuesday, November 3, 2009

Ax Hammer finished!

0 comments
You may remember this Ax Hammer from way back in January:


Well, I finally got to gluing it the other day, and it has become our realms favorite weapon. It is a lot of fun to fight with.

The cover was a bit of a tricky job, and done in a rush, so not as good as it could have been.

Monday, August 31, 2009

More Rag Rug Garb

0 comments
I am wondering about selling them online, what price would you expect to see somthing like this for?


The plain color rugs have been out of stalk for a wile so I got some more scrap rugs to try some other things:

A Rag Rug Tabard/Vest:

I have been wearing this one under my chain mail, and man does it make good padding! I can hardly feel the chain anymore when hit hard, where as before a hard strike to the edge would put me on the sidelines for a short bit (Oriental 4 in 1 half vest).

And I have made a sort of poncho that can go with it (or the base peace of the coat), didn't turn out quite as I had hoped so I am going to get some more at some point and try again. I have yet to need to wear it (our warm weatherjust decided to hit-ish).